
The Benefits of Repairing Wood Columns with Dura-Fix: A Step-by-Step Guide

Failed attempts at filling wood can accelerate future decay
Wood columns are a timeless architectural element, adding charm and structural support to both interior and exterior spaces. However, exposure to moisture, insects, and general wear and tear can lead to rot, cracks, or deterioration over time. Instead of replacing an entire column—a costly and labor-intensive process—many homeowners and contractors are turning to Dura-Fix, a high-performance epoxy repair system specifically designed for wood restoration.
Why Choose Dura-Fix for Wood Column Repair?
1. Cost-Effective:
Replacing a wooden column can cost hundreds or even thousands of dollars, especially if it’s custom-made or load-bearing. Dura-Fix offers an affordable alternative, restoring the existing structure at a fraction of the cost and saving the original elements of the building.
2. Durable and Long-Lasting:
Dura-Fix bonds deeply with wood fibers, forming a solid, weather-resistant repair that won’t shrink or crack over time remaining strong and flexible. It’s ideal for both indoor and outdoor use, ensuring longevity under various environmental conditions.
3. Preserves Original Architecture:
Repairing instead of replacing allows homeowners to maintain the original character and craftsmanship of historical or custom woodwork—an especially important factor in restoration projects.
4. Easy to Work With:
Dura-Fix is designed to be user-friendly. With basic tools and a bit of patience, even DIYers can achieve professional-quality results.
Step-by-Step Instructions for Repair Wood Column Repair with Dura-Fix

Sound paint can hide the decay
Don’t rely solely on a visual inspection.
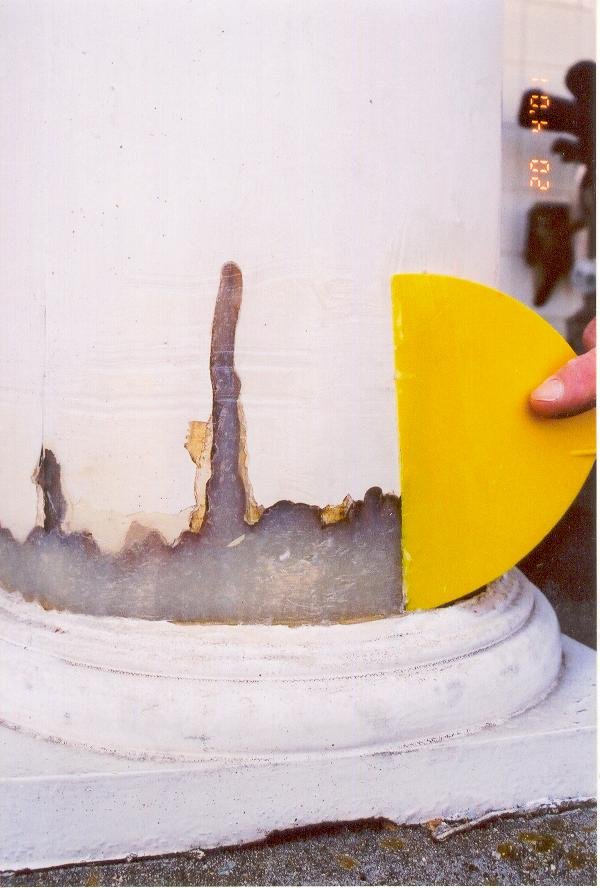
Step 1: Assess the Damage
Begin by inspecting the column thoroughly. Tap the wood with a screwdriver or similar tool to locate soft spots. In most cases, only 5-10% of a column requires repair. Don’t rely solely on a visual inspection. Sound paint can hide a damaged substrate. Conversely, failed paint can hide a quality, sound substrate.
Step 2: Remove Rotted Wood
Use a chisel, utility knife, or rotary tool ( like a Dremel or die-grinder) to remove all loose, crumbly, or soft wood. Make sure to reach solid, sound wood to ensure a proper bond. Before proceeding with the repair, make sure the wood is completely dry.
Step 3: Mix The Dura-Fix Epoxy Filler

Dispense and mix on a clean, flat surface
Thorough mixing of the 2 components is a critical step.
Follow the manufacturer’s instructions to mix the epoxy components thoroughly. Dura-Fix comes in two parts—a resin and a hardener—that must be thoroughly combined until a consistent color is achieved.
Step 5: Apply the Epoxy
Apply
Dura-Fix
Dura-Fix will not slump or sag in a vertical surface. Long open time provides ample time to position the material to the desired shape.
Use a putty knife or spatula to apply the mixed Dura-Fix to the repair area. Shape to match the original contours of the column. Dura-Fix will not slump or sag on a vertical surface. Time spent positioning the material in place will pay off when sanding.
Step 6: Let It Cure
Allow the Dura-Fix to cure for the recommended time—usually 10 to 24 hours, depending on the temperature and humidity. Do not disturb the repair during this time.
Step 7: Sand and Paint
Once fully cured, sand the surface smooth. Then prime and paint the column to match the existing finish. The repaired area will be virtually invisible and stronger than before.
Repairing wood columns with Dura-Fix is not only practical but also a smart investment in preserving your home’s beauty and integrity. Whether you’re a seasoned contractor or a dedicated DIYer, this method ensures a solid, long-lasting repair that extends the life of your columns for years to come.
For more information on Dura-Fix visit our product page.